One of the things that required attention during the refurbishment of my 1989 T25 was the sliding door handle. Compared to the front door handles it was extremely pitted and corroded, and having taken the entire vehicle down to almost bare metal, repaired a great deal of rust, replaced 12 panels, and completely resprayed it, a scabby old handle was in danger of sticking out like a sore thumb.
My first attempt at fixing it was to remove the corrosion and shot-blast it, with the intention of repeatedly respraying and sanding it until any pits were filled and it would look new enough to re-use. For various reasons, that turned out to be a harder job that I imagined, and the fate of that job was finally decided when I discovered that, even though I keep all part from things I disassemble in a tray, I had lost the small spring which re-centres the key barrel.
Having spent half a day attempting to make a new one, without being able to find a drawing of what it looked like, I went on the hunt for a replacement handle, with the intention of either robbing it for the spring, or swapping the lock barrel and using the new handle.
The description of sliding door handles for this vehicle are somewhat complex, and I’m sure there is the potential for a comedy sketch somewhere. Since the sliding door is on the passenger side of the vehicle, left-hand drive vehicles have the door on the right side, and right-hand drive vehicles have their door on the left side. Many descriptions do not make a clear distinction whether they assume a left-hand sliding door as the sliding door on the left side, or the sliding door for a left-hand drive vehicle. To make matters worse, the door on the right side of a left-hand drive vehicle slides to the left, and the door on the left side of a right-hand drive vehicle slides to the right.
I will leave it up to you to decide what the unambiguous meaning of ‘a left-hand sliding door’ is.
Whatever conclusion you come to, you’ll discover that there is no supply of replacement handles for the sliding door on a right-hand drive T25.
I therefore decided to buy a new handle for a left-hand drive van because they are touted as being suitable replacements, and are described as working exactly the same, except for the fact that the key turns the opposite way to lock and unlock. In other words, they’re not exactly the same.
My intention was either to rob the new handle of its spring, or swap the barrels over so the new handle worked with the existing keys, and simply put up with the fact that the vehicle now had a sliding door with the ‘wrong’ handle.
What Is The Difference
Turning the key on the sliding door handle pushes a pin out to either the right or the left to lock or unlock the mechanism, depending on which direction it is turned. A spring then centres the key barrel when it is released. The handles on left- and right-handed doors are turned through 180 degrees – opposite ways up. They fit into the locks using the same square shaft, however they are designed so that the pins which the key operates stick out of the opposite side on left- and right-handed units. This means that the key turns clockwise to lock and counter-clockwise to unlock on both left hand and right hand drive vehicles.
If you use the ‘wrong’ handle, it will work, except it is necessary turn the key the opposite way to lock and unlock the door.
What Happened
The final result was relatively simple and should have taken half-an-hour. The fact that I spent half-a-day on it is just part of learning, and I’ll outline the entire set of events because it should be useful learning.
Having considered my attempt to refurbish the old corroded handle, I decided to scrap it, and use the nice new one, albeit being the opposite-handed.
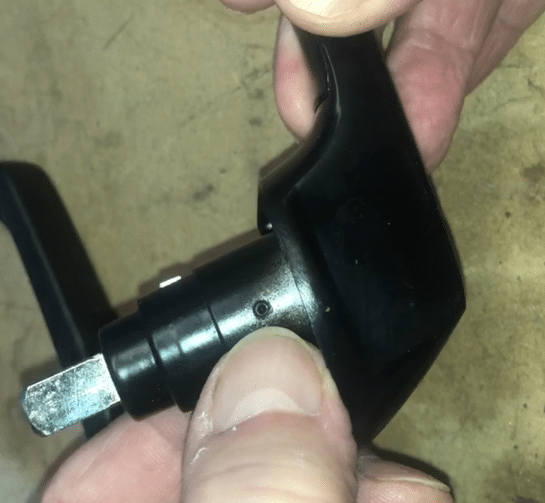
Dismantling The Handle
Discounting the small plastic finger-grip which might be fitted to the back of the lever, the handle is in two main pieces, and barrel simply pulls out after removing a tiny grub screw. On the old handle this was slotted, but the replacement, which was probably a pattern part, used a hex. Not even my tiniest hex bit fitted it, but a precision screwdriver did jam in and unscrew it. It wasn’t tight.
If you put the key in the lock now it is easy to pull out the barrel. On the end of the barrel, or more likely at the bottom of the hole it came out of, you’ll find a small spring, which you can pull out. Don’t do what I did and lose it.
The pin which is moved by the barrel also slides out sideways if you are wanting to strip the handle completely to degrease or refinish it.
So, handle, barrel, spring, locking pin, and tiny retaining screw.
On the new lock this is a hex screw. On my original it is slotted. This engages in a slot around the body of the barrel, which allows the barrel to rotate but stops it coming out.


First Attempt
I originally thought the simplest way would be to swap the lock barrels over. However, the old barrel did not rotate freely in the new lock. It was rubbing on something and not turning properly. This meant it would not have re-centred properly.
Having measured the diameter of the main barrels, and the recesses in the handles, I discovered that the outer stainless steel ring with the key slot in it was slightly larger on the old barrel, resulting in it binding.


One way to solve this could have been to open out the recess in the handle, but this would have damaged the finish.
This outer ring is crimped to the barrel and I had a go at tapping around the circumference of the crimp in an attempt to tighten it up. It worked, but not enough.
I therefore thought the better alternative to this was to swap the ‘levers’ from the existing barrel with the ones in the new barrel, so the old key would work, and use the entire new handle and barrel assembly.
Second Attempt
The key moves seven brass pieces in the barrel, which I would refer to as ‘levers’ in other types of lock. In this barrel, they slide from side-to-side and are not a lever, however I’m going to called them levers because I know of no other name for them.
They fit into slots and are sprung to one side. When the correct key is in place, it moves them to such a position that they are central in the barrel, and no part of any lever protrudes from either side. If a key with the incorrect pattern is used, one or more will stick out to one side or the others, and the barrel will not rotate.
With the key removed, these levers are easily pulled out. The small hook on the side of each lever engages a tiny spring in the barrel. When you remove the levers, keep them in order and be careful to not misplace the tiny springs, which will probably remain in their drill-holes.
The brass leverl on the old lock are numbered to indicate the position of the cutout. Knowing the numbers and where they fit along the key would allow you to specify the pattern needed on the key. You could write those down in case they got mixed up. The ones on the new barrel are not numbered.
I removed them from both barrels and laid them out. There are five on one side, and two on the other. It was then possible to give each a clean before replacing them into the new barrel in the same order.
This should have meant that the new key would work in the old barrel – which it did, the levers all lined up perfectly. I though it would because I had tried the new key in the old barrel before I disassembled them all. It had the wrong pattern on it, but it was clear that it was going to work with the levers from the old lock.
So the new barrel should now of course work with the old key and the levers from the existing lock.


It didn’t. The old key didn’t go into the new barrel at all.
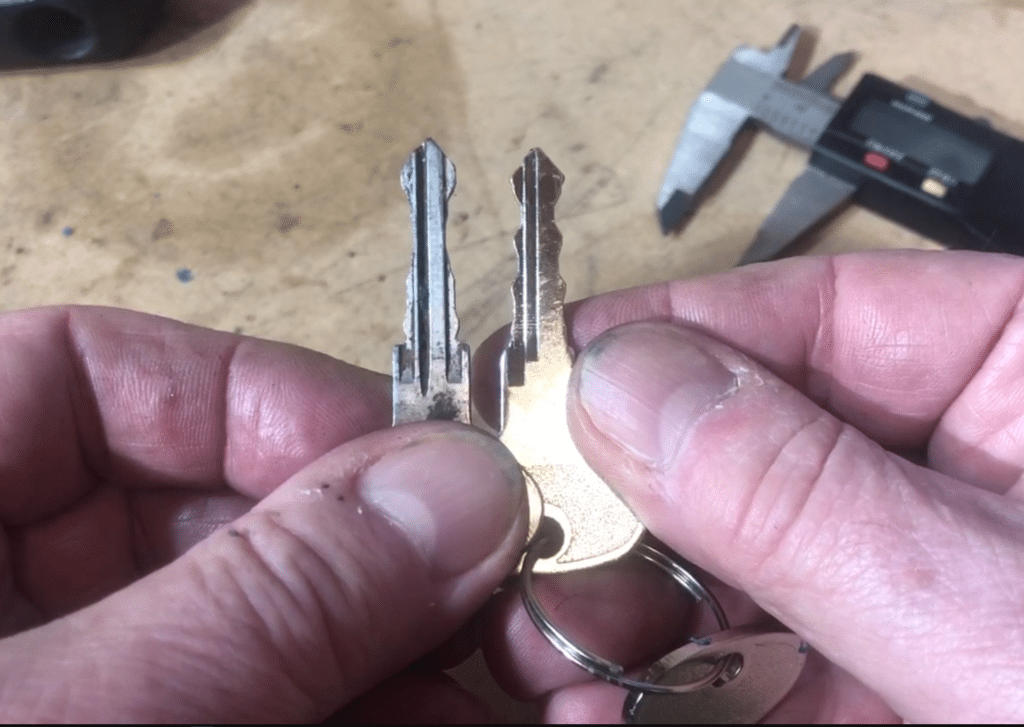
The keys were different in more ways than just the pattern cut into them. They have different profiles. Looking at the end of the key, the old one has an extra rib on it, which isn’t on the new key. This means the new key fits in the old barrel, but not vice-versa. The presence of an extra rib stops the old key going in the new barrel, but the absence of that rib on the new key doesn’t stop it going in the old barrel.
That means I won’t be able to use the new barrel with the existing levers and old key. I’ll have to find a way to make the old barrel turn properly in the new handle.
So I need to swap all the levers back the way they were, but not before I make another mug of tea.
Third Attempt
Now to make it fit the new handle.
The measurements had showed it was only about a tenth of a millimetre too large and a bit of careful work on a fine sandpaper wheel finally produced a satisfactory result.
Having carefully put all the levers back in their original places in the old barrel, the old key does now work the way it always had. All the levers are flush with the face of the barrel, so we can reassemble the handle.
Putting The Spring Back In
I struggled for ages trying to put the centring spring back into the bottom of the mechanism. You can’t just put it on the end of the barrel because the legs stick out. It’s very hard to see how it’s supposed to engage with the various slots and recesses in the bottom of the hole, so dropping it in first and trying to place it is hard because you don’t know where it’s supposed to go.
If you look at the side of the handle, there’s a cutout near the place where the pin slides.
It’s just the right size for the spring. What a coincidence? Not it’s not.
- Place the spring in the cutout, so the legs of the spring stop it falling in.
- Push it gently in using a screwdriver. You’ll feel the legs spring in as you push it.
- Look down the hole where the barrel goes, and push the spring in until it is almost central
- If you push it too far it will fall in and be loose. Tip it out and try again.
Now when you push the barrel in, it will engage with the spring and centralise it.
Try gently turning the key in both directions and make sure it springs back.
Don’t force it if it doesn’t turn easily because it isn’t engaged properly and you’ll bend one leg of the spring, which will result in the making of another mug of tea while you carefully straighten it with needle-nosed pliers. I know because I did that.
Final Result
I now have a new handle, for a left-hand drive vehicle (right side door that slides to the left) fitted to my right-hand drive van (with a left side door that slides to the right) and it works fine.
It’s supposed to now lock and unlock by turning the key in the opposite direction to the way it should.
I’m sure it does. I don’t notice.
On reflection of course, the easiest way to solve the problem would have been to simply remove the grub screws, remove the barrels, fix the interference fit that was occurring with the old barrel in the new lock, and reassemble it.
Had I known it would be so easy to remedy that binding I would have done that and it would have taken half-an-hour, not half-a-day.
However, I wouldn’t have learned so much about VW T25 sliding door lock barrels.
Notes and Specifications
Coil Spring
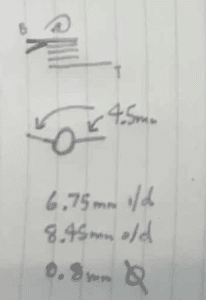

If you need to make one:
This consists of 5 turns of 0.8mm spring wire, with an outer diameter of 8.45mm and inner diameter of 6.75. The ends are 4.5mm and set at 145 degrees.
You might get 0.8mm wire from HobbyBloxs, or alternatively, Springs and Things may have a suitable coil spring that you could modify.
Cylinder Lever Springs


If you need to source one:
They are 1.4mm diameter, and 6.5mm uncompressed.
When compressed that reduces to 3.1mm (not shown).
The last time I needed tiny springs like this was for putting a spring behind a small ball bearing to make a custom lubrication nipple. The only place I could find any were from China.
Again, it’s worth checking Springs and Things because their products vary.
I guarantee if you put them on a piece of paper and sneeze they’ll literally blow away.